Sunday, April 08, 2007

Painting a Phoebe--Cobwebs and Crud


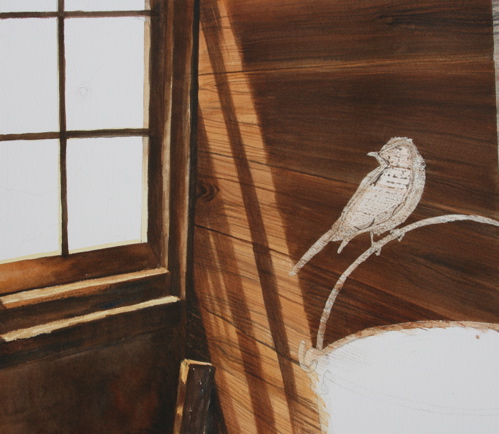
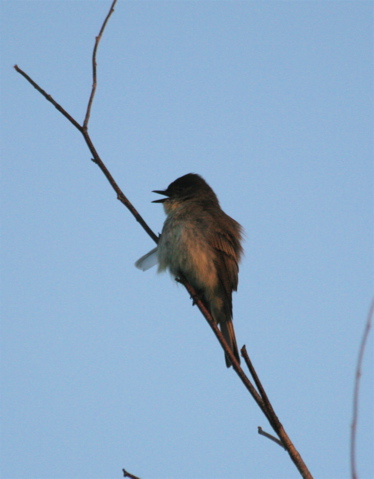
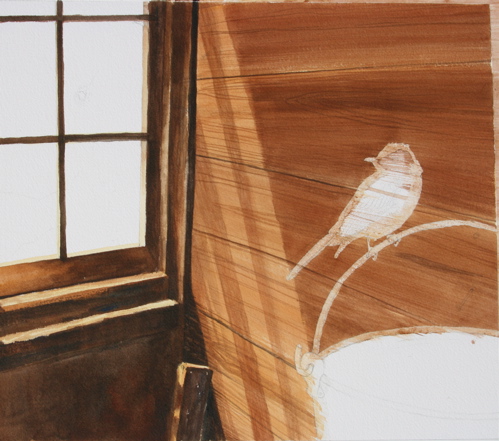
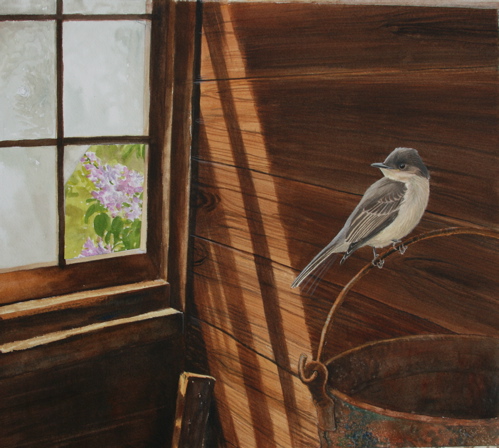
It's the morning of the third day of work. Now, I get to put the phoebe in. I don't really have that much to say about the process of painting the bird. I've been doing it for so many years that it happens very quickly. The only tricky part here is lighting it so it can sit believably in the scene. I'll talk more about that later. It's by no means done here, just blocked in to hold the space.

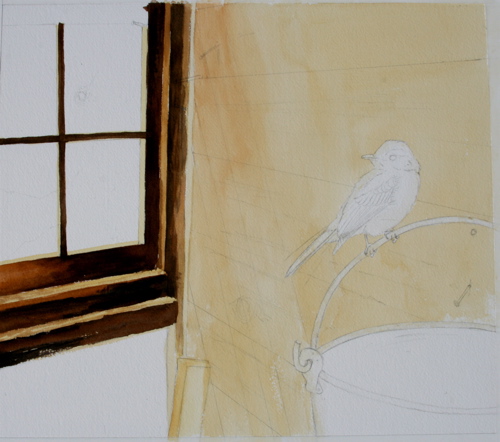
Back to the wood. I have a friend, Taff Roberts, who's a talented artist-woodcuts and writing-as well as being a housewright. Taff's from Wales. He showed me some of the woodgraining he's done while restoring old houses. In woodgraining, you take a surface that's bland and pointless, and you paint woodgrain on it until it looks like real wood paneling. It's not that hard. You use a broad brush dipped in different colors of paint, separate the bristles a bit, and run it horizontally over the surface, letting the brush bristles organically define the grain of your faux wood. This technique was used liberally in Victorian finishes, often on furniture made of wood without its own distinctive grain. It's clever, and it fools the eye amazingly well. This is what I did with this painting-make fake wood.
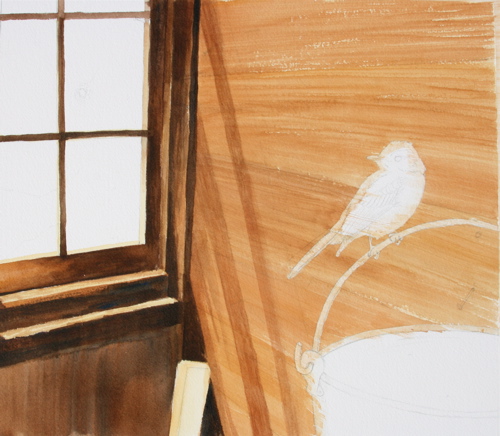
Here, it's very important to keep the wood grain lines consistent, so that the board planes are believable. Because I had masked it with film and masking compound, I painted over the bird quite freely, making sure there were no zones around its shape that might suggest I'd had to paint around it. The single most important thing I had to do in creating depth was make the boards behind the bird consistent. Any perturbation in their lines would make them "lift off" and make them come forward, instead of staying back behind the bird. Now that the bird was in, there would be no more broad brush strokes over it!

Another really important thing in making the shadows believable is running the woodgrain through them, so you can see the grain running through both darkness and light. Of course, the grain lines are darker in the shadows, and lighter in the light, but they are what make you believe that that's really a sunbeam playing over the surface, or a deep shadow. It's the change in the color of the grain lines, and the fact that you can still see them in the deep shadow, that really fools the eye. In all the overpainting, I was careful never to touch my sunbeams. Wouldn't want to dull that bright,warm color down. But I worked on the shadowed wood a lot.

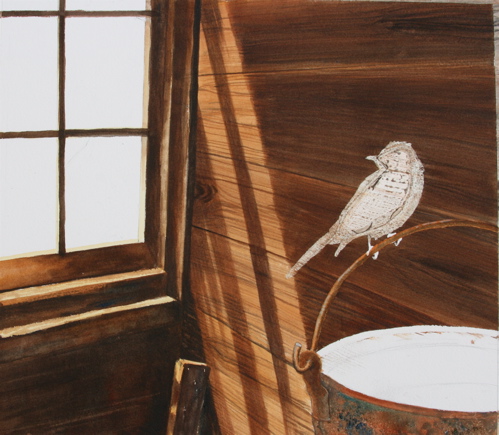
I kept struggling with it, though, because my wood looked too fresh and new. It looked like cedar, and I wanted it to look like aged pine. So I kept taking darker and darker washes over it, ultramarine blue, and finally Chinese white to gray it out a bit.

In fact, while the window looked cruddy and old, the whole right wall just looked too new. It was time for some cobwebs and crud. Up to this point, I'd painted everything transparently. Now, I got out my Chinese white, which is a color with some opaque body to it. I painted some of that nameless scuzz that hangs on barn walls-cobwebs and dust, I guess. I put some cobwebs in the corners. Fun!

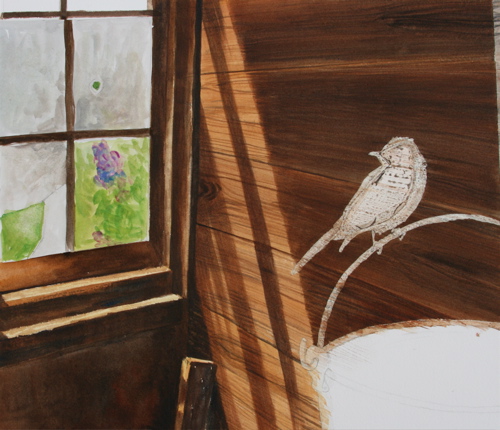
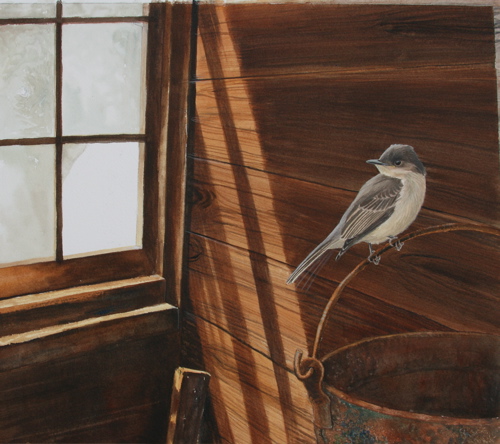
Bill was working at home, so I kept taking the painting to him for suggestions. He caught a bunch of things-wavering lines, nuances of color that suggested that the boards were new rather than aged. I made sure the parallax was right (see the fixed seam above the phoebe's head? It was fanning out too much and that ruined the perspective) and took washes of ultramarine blue over the cedar-red boards to age them. A few well-placed rusty nails helped with the age factor, and more crud hanging from the cracks. The space underneath the window looked dull and blank to me, so I went foraging out in the garage to see what was hanging on its walls. Ahh. An old crusty, rusty snaffle bit that we'd dug up while turning the garden. It's just half a snaffle bit. This is a horse bit that has a joint in the middle. Sometime in the last century it rusted in half. While I was at it, I painted another fake panel of lilacs for the window and taped it on, to make sure the concept was holding. It looked good, especially with the hazy suggestion of more lilacs in the pane directly above it. Again, the perfect subject for watercolor.
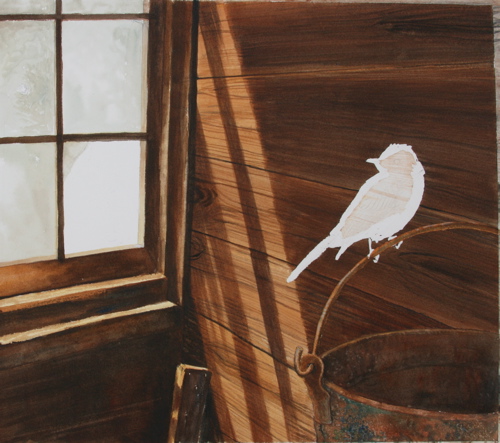
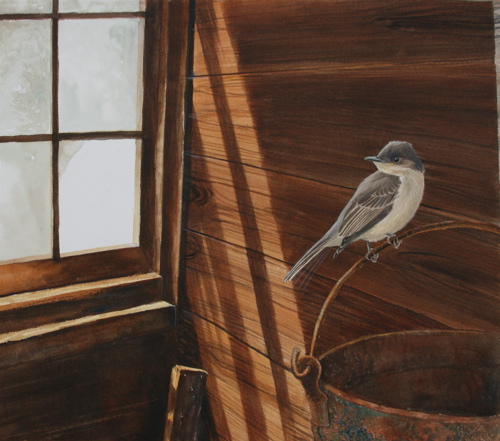
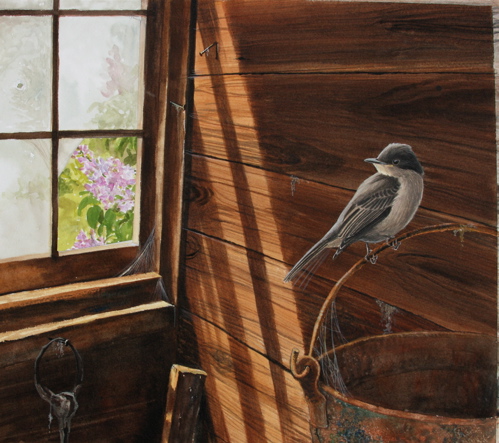
You can see in this image that I've darkened the bird a whole lot. I'd think I had it dark enough, and then I'd step back and it was still too lit up. I kept running violet and burnt umber and buffy gold and ultramarine streaks into its breast to darken it. Once he was nice and dark, boom, he suddenly fit into the scene. Compare this image with the one immediately above it if you don't think that helped. It's hard to go and make yourself paint shadow colors over a bird whose "local color" is technically "correct," but in order to make him inhabit the shadows, I've got to paint him lavender and gray and burnt umber. And that's what's really FUN.

I saw a short film once about a Japanese couple who work together painting huge scenes on rice paper. She paints the figures, carefully constructing them, drawing their anatomy. And when she's done, he gets in there with great basins of wet paint and runs sloppy washes right over her carefully painted figures. She has to leave the room when he's altering her work. But she agrees that he improves the end product. That's the kind of tension that exists between the scientist in me (who knows what color a phoebe "is," or should be) and the artist, who knows that shadows have all the colors of the scene running through them, and knows how to inject mood into a scene. The scientist paints a correct phoebe, and the artist comes in, politely asks the scientist to get lost, and messes with the stage and the lighting.

Everything I'll do from here on out falls into the realm of fine-tuning. The painting is just about done, at the end of the third day. Got to make sure I don't get too carried away with cobwebs and crud. Just as I'm getting the hang of painting them, it's time to stop. Wouldn't want the phoebe to turn into Miss Haversham. Thanks to Big Stuff for your keen eye and helpful suggestions.

Labels: , , ,

Friday, April 06, 2007

Painting a Phoebe, Part 2


I've mentioned the concept as being paramount in making a painting. Maybe it's the illustrator in me. I've been illustrating since 1976, and I can't help but tell some kind of story with my paintings. So I had this concept of a phoebe in a barn that just had to get out. As I worked on the painting, it became clear that there would have to be some way for the phoebe to get in and out of the barn in which it was perched. How to do that? Break a pane out of the window, of course.

It was a little alarming that I hadn't considered that before, but my mind was all filled up with windowpanes and sunbeams, and I hadn't had time to think about how the phoebe might have gotten inside the barn in the first place. And obviously, he'd need a way out, too. So I decided to knock a windowpane out. But which pane?

This is where watercolor can be a challenge. You have to know exactly what you're doing. You have to plan. You can't really paint an intact window in transparent watercolor and then decide to go and break a pane out of it. So I took another piece of paper, painted some sample panes and broken places on it, and taped it to the painting. This way, I could try out some ideas before committing them to paint.
Two panes (plus a bullethole) seemed like overkill. It would look better with just one pane out. The lower right pane seemed the best choice, compositionally.

As I looked out my studio window, I could see my favorite lilac, about to bloom. What heaven, to look out and see that. I decided that the glimpse of the outside world would be my heirloom lilac, bathed in sun, blooming its head off. I painted a little panel on a scrap of watercolor paper and taped it to the painting. Good. I like that. I painted the study on a day when it was in the upper 70's. By the next day, it had dropped to 22 degrees, and it's clear to me now that my heirloom lilac will not be blooming this year at all. I am sick about it, but there's nothing you can do about a crispy, wilted, translucent lilac. You just have to suck it up and hope the thing lives another year, having had its entire first flush of leaves and blossoms frozen smack off. April. Pah.

The copper bucket was next. Apologizing to the Carolina wrens, I got a stepladder out and lowered the ancient holey bucket they nest in under the eaves. I put it up there for them four years ago, and they've nested in it ever since. I carefully removed their nesting material-not yet renewed for the season-and dumped out the dust, feather sheaths and blowflies that had accumulated over the years. Took the bucket inside and painted it. An hour later, while I was still working on the bucket, I went outside to photograph the painting and a pair of Carolina wrens scolded and sang and made it very clear that I was to replace the bucket the moment I was done with it. Message received.
You can see that, having made my decision about the windowpane, I've removed the sample panel and left the window blank again. Time to focus on the copper bucket.
Here, on the bucket, salt was my friend. I wanted a scrofulous finish, with Paris green and rust and oxidation creeping over it. I doused the surface with strong pools of dark pigment, then sprinkled table salt onto it. The salt would attract the water, and leave little pools of pigment wherever it had settled. Kosher salt would make larger sparkles, having larger grain. I used both. The bucket was a snap to paint, after I peeled off the masking compound.
I've peeled off the phoebe's masking compound too. Believe it or not, this is just the end of the second day. I told you a lot happened that second day. I've got the wood pretty much under control, the bucket painted, and the windowpanes started. I like the way the light is coming in. It's believable. Believable light is the single hardest thing to do in any painting, as far as I'm concerned. You have to exaggerate it so much to get it across at all...I'm saving the phoebe for dessert. I've also got a job ahead of me in ageing the wood behind the phoebe. Right now, it looks like fresh-milled cedar, and I want it to look like old, old pine. The stuff of much thought, consideration, and many overwashes. At least the light is happening. To be continued...

Labels: , ,

Thursday, April 05, 2007

Painting a Phoebe

As those of you who've been with me for the past year know, eastern phoebes are special birds for me. In several of the springs of my life, I've done a phoebe painting. Phoebes move me, enough to have named our firstborn for one, enough to make me paint pictures of them that have something to say about the stages in my life. And last summer, with a lot of help from Phoebe, I raised two orphaned phoebes: Avis and Luther.On March 13 of this year, a phoebe showed up singing in the yard. He sang around the garage and the back deck. When I walked out to the driveway, he flew to a low branch on the ash tree that hangs over the pavement. Hmm. The same branch Luther used to go to when he wanted to be fed. When I moved closer, calling his name, he didn't retreat, but kept chipping and wagging his tail. From there, he flew to the birch tree that overhangs the birdbath where Luther drank and bathed. It was a favorite hangout. I have no proof it was Luther, but I felt I knew him, and it seemed he knew me. He certainly wasn't skittish around me. Time will tell; if the weather lets up (it's in the 20's today) perhaps this bird will decide to stay, and one fine day come in to a Pyrex plate full of mealworms. That would be something fine.

Clearly, it was time to paint a phoebe again. I thought for a month or more about what I wanted to do with this painting. For me, the bird image is the least of it. The setting is everything. Ever since we were in New Mexico in November, I've wanted to paint a barn interior. I saw light streaming into adobe structures, old wood and sunbeams...Reading The Girl with the Pearl Earring, a fictionalized account of the Dutch master Vermeer's life, just enhanced that feeling. I wanted to play with light coming in a window. So I designed a scene that would incorporate some of the things I love most: a phoebe, a barn interior, and sun coming through a window.Here's the drawing, already transferred to the watercolor paper. The painting will be nearly a square at 13 x 14 1/2".

Because there will be a lot of darkness in the painting, it's going to be necessary to mask the bird and foreground perch (a copper bucket, also a beloved possession that dates from my early childhood in Kansas). Here, you can see the yellowish masking compound that I've painted on the bird and bucket to protect them from the dark brown washes I'm planning to lay down. Here, with the finished drawing, transferring it to watercolor paper, and masking it, my first day of work ends.Ohhhhh.....this is too much fun. I'll take you a bit into the second day so you can get a peek at how the painting will evolve. I decide to block in the window and the wall. The window has some of the darkest values in the painting, and I want to lay something really dark down so I can dial up or down from that as I build the rest of the scene. I put a sunny buff -yellow underpainting down on the wall, that will give me some of the lightest values.At this point, the inevitable depression set in. I should see it coming, but it always creeps up and surprises me. It's a stage I go through with every painting, even when it's going well. I become convinced that it is in fact a piece of crap. I think one of the reasons I love to write so much is that it's mysteriously free of that downcycle. When I'm writing, I just go.

I sank deeper into an unproductive despair, until I realized that the only thing that would fix me was going out for a walk. So Chet and I set out on the Loop, and a good soaking in 80-degree sunshine, a handful of butterflies and a deep draught of wildflowers was just what the doctor ordered. See yesterday's post!

Refreshed and recharged, smelling of sunshine and fresh air, I was ready to make the wall look like wood. Another couple of washes of burnt sienna, quinacridone yellow and burnt umber, and I got the plane laid down. It was no longer a flat field of color; it was lying in space the way it should. I painted in some of the woodgrain and really felt the painting begin to take off.

Here's how it looked by the middle of the second afternoon. I kept painting until the light went away, and a lot more happened that afternoon, but this seems like a good place to stop. The painting is starting to look like something now. I hope from this you see that watercolor is not a medium over which one should linger and noodle. It takes nerve and speed, and if you're working well, it really doesn't take long to make something out of nothing. In the end, that may be my favorite thing about it. That, and the luminosity, the way you can layer one wash on another but still see the first wash, and the way the paint feels, flowing out of the brush. OK, there's nothing I don't love about watercolor.

Tomorrow: sunbeams, more wood, and a bucket.

Labels: , ,